

Setting up a cluster of docker servers with Ansible
Docker is a well known container management system that is used to manage containerized applications. The idea is to pack, ship and run any application as a lightweight container. This means that all the requirements for the software to run is part of the image, instead of it traditionally being installed on the host. For example, you can run WordPress (With MySQL and phpMyAdmin) on a Linux server without first installing Apache, MySQL on PHP on the server.
On a single node, we can simply use the standard Docker run commands to deploy a container. However, it is when we have a cluster of servers that we can use Docker Swarm, and this is where the real value of Docker lies. Docker swarm is a container orchestration tool. We show you how to build a cluster of Docker servers it with Ansible. This allows you to use Docker Swarm and harness the real value of Docker containers.
- A Docker Swarm is a group of physical/dedicated or virtual machines that are running the Docker application and that have been configured to join together in a cluster.
- The cluster activities is controlled by a swarm manager, and machines that have joined the cluster are referred to as worker nodes.
- One of the key benefits associated with the operation of a docker swarm is the high level of availability offered for applications.
- Docker Swarm lets you deploy containers to multiple hosts similar to Kubernetes.
- Docker Swarm has two types of services: replicated and global.
We suggest you first set up your Ansible Control Server before starting this tutorial.
What we are building
The Docker cluster we are building is a 3:7 setup. This means we have three manager nodes, and seven worker nodes. There are many configurations you can use between the amount of managers vs worker nodes and you need to follow what is best practice for your organization. You can read more about Docker Swarm here.

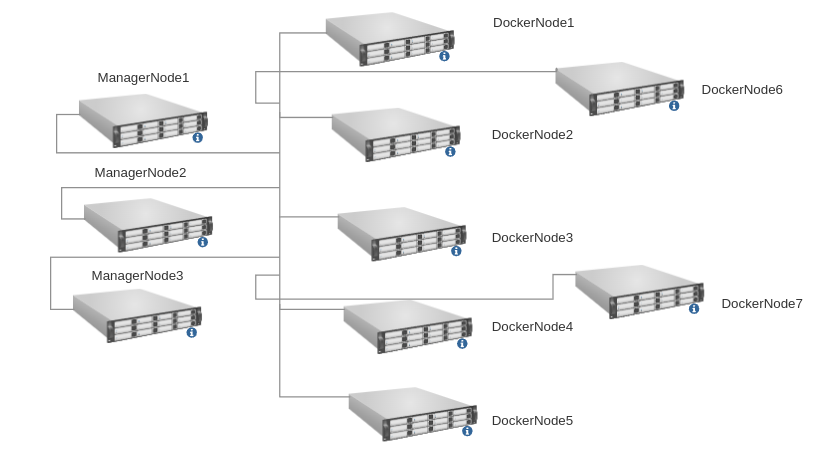
As you see, you will need a total of 10 servers here. Before running your Ansible playbook, you need to have already done the SSH Key exchange from the Ansible server to all of the workers and nodes. See our Ansible Control Server article, as well as How to generate SSH Keys.
Starting our Ansible playbook
An Ansible playbook is a file that contains the Ansible code, a organized collection of script and commands defining the tasks to be completed. Playbooks use YAML, a human-readable data serialization language. YAML is a recursive acronym that stands for “YAML Ain’t Markup Language.”
To start off, let’s look at the structure of our playbook, so that you can begin with the end in mind.

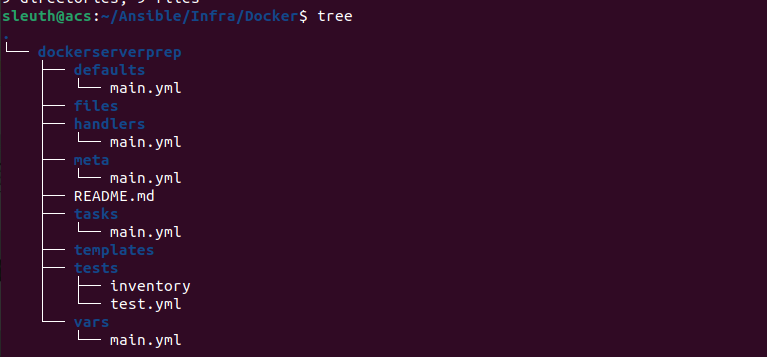
As you can see, we have our playbook.yaml in the root folder, with two sub folders below that: hosts and dockerserverprep. The latter has several sub directories with files in it, and that is because we created a role called dockerserverprep. Creating a role for the task we are trying to complete gives us a lot more options in how we want to complete the task. It also allows you to expand this playbook into more roles, more hosts files and ultimately more options on what gets run against which servers on your infrastructure.
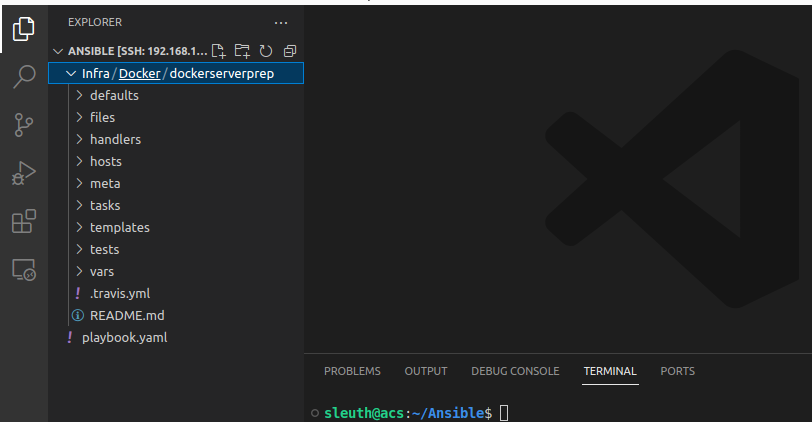
BEFORE you start coding: There are many, many IDE’s available and everyone has their favorite. We prefer using Microsoft’s Visual Studio Code as it makes writing YAML very easy. It also allows us to connect from within VSC to a remote server and write the code directly on there, and it has a built-in terminal.
You can use whichever one you prefer but we urge you to try VSC and see if you like it.
Step 1: Create the dockerserverprep role
The way we create a role is through the ansible-galaxy command. Ansible Galaxy is essentially a large public repository of Ansible roles. You can browse the website, search by tag, or by function, to find the role you want. But in this case, we will use the init switch with the command. This will allow us to create a ‘blank’ role and edit the parameters ourselves.
$ ansible-galaxy init dockerserverprepRunning this will create the ‘dockerserverprep’ role in our working folder. This is automatically done by Ansible Galaxy without any further user input. It will create the complete folder structure as well as ‘n README.md file for this Ansible role. The folder tree will now look like this:
Next, we will create a folder called hosts in which our hosts file will go. You can either do this via command line, or using VSC by right-clicking in the Explorer window and creating a new folder. Lastly, we need to create the playbook.yaml file. This is the starting point of the whole playbook and the first code we write will be in this file.
Step 2: playbook.yaml
We can now begin writing code.
In your playbook.yaml add the following:
- hosts: all
  remote_user: root
  become_method: sudo
  roles:
    - dockerserverprep
Note the indentation / spacing. In YAML, this is critically important. Most of your run errors will be because of incorrect indentation, so make sure you get it correct the first time, every time. (It is always two spaces, 99% of the time)
The first line declares which hosts we want to run this playbook on. Since this is being created for a specific function, we will run it against all hosts in the hosts file. However, you can have several playbooks targeting different parts of your infrastructure depending on your requirements. The target hosts will be declared in this first line.
The second and third line declares that the remote user must be root, and Ansible should elevate the current user to that if required when running the playbook.
The fourth line is where we specify that we are working with roles.
`Line five is where we declare which role we are using. You can have more than one role listed here, and Ansible will execute them in order until completion.
Step 3: The hosts file
Next, we will work on the hosts file. Change into the hosts directory, and create a hosts.yaml file. Now open this file for editing. You will add a total of 10 hosts: three manager nodes, and 7 worker nodes. Your IP address ranges will be different, so add what is relevant to your infrastructure.
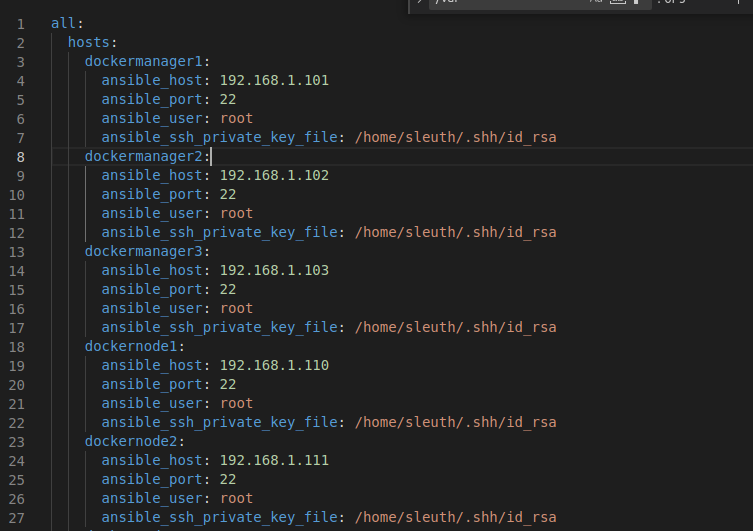
In this example, you can see the formatting of the hosts.yaml file. You can now add all the hosts you will need to deploy your cluster, as long as you follow this format and the correct indentation. Note the path to the SSH Key, and the port number, as yours might be different.
Editing the Role

Looking back at the file and folder structure of the role, we see the following folders:
- defaults
- files
- handlers
- meta
- tasks
- templates
- tests
- vars
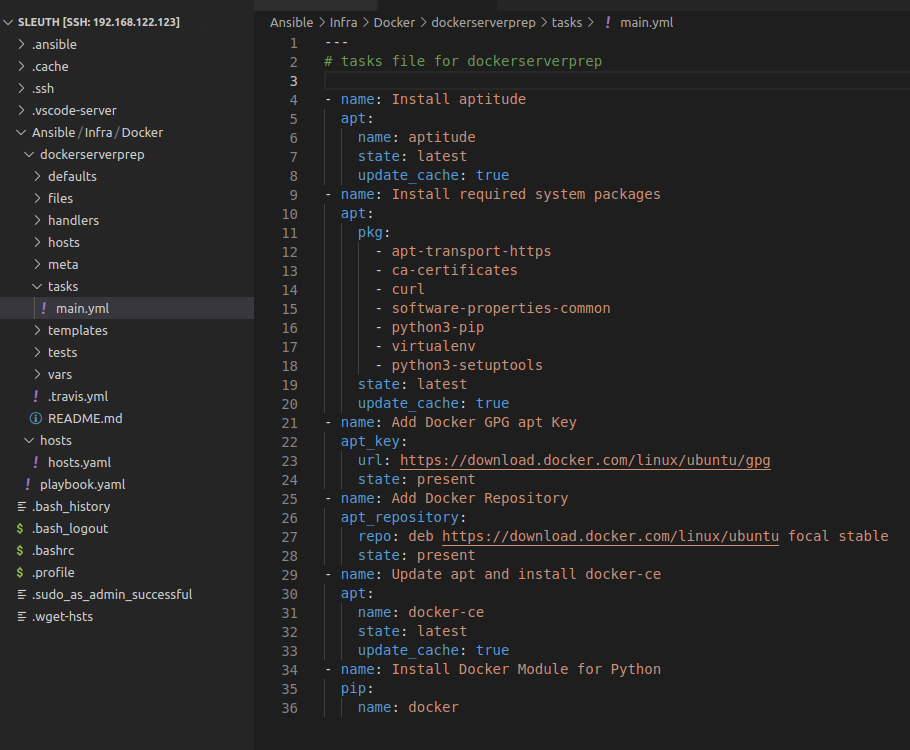
For the purpose of this role, we will only be working in the tasks folder. Open main.yml for editing. We will use the apt module in Ansible to run the commands on the Ubuntu hosts. (If you are using CentOS, you will use the yum module) Here is a breakdown what we will be doing:
- Install aptitude
- Install required system packages
- Add the Docker GPG key
- Add the Docker repository
- Install Docker
- Install Docker module for Python
The goal of an Ansible role is to define the desired state of a resource. This means that you will not say “install aptitude for me” but rather “aptitude must be present”. This will make sense when you look at the code in the /tasks/main.yml file:
We have now created the final file we need for this playbook to work.
Recap of what was done
We have now created our Ansible playbook. We created a hosts file and added all the hosts we want to run the playbook on. We then created the role for the tasks, and added the desired state of each host in the tasks file. Now we can run our playbook, and it will create our Docker cluster.
$ ansible-playbook playbook.yaml -i hosts/hosts.yamlRunning the playbook
Ansible will first log in to all the hosts, and then run the playbook. Once it is completed, you will have your Docker cluster for use with Docker Swarm.