

Install Jenkins on Ubuntu
Jenkins is the leading open source automation server, with hundreds of plugins to support building, deploying and automating any project. It allows you to help automate the parts of software development related to building, testing and deploying. This facilitates CI/CD or Continuous Integration / Continuous Delivery. Jenkins is used to build and test your software projects continuously making it easier for developers to integrate changes to the project, and making it easier for users to obtain a fresh build. It also allows you to continuously deliver your software by integrating with a large number of testing and deployment technologies.
Jenkins achieves Continuous Integration with the help of plugins that allow the integration of Various DevOps stages. Let’s say that you want to integrate a particular tool: all you need to do is install the plugins for that tool. Example: Git, Maven 2 project, Amazon EC2, HTML publisher etc. There are over 1000 plugins for Jenkins and it has over 147 000 active installations and over 1 000 000 users.
Installing Jenkins – system requirements
Minimum hardware requirements:

- 256 MB of RAM
- 1 GB of drive space (although 10 GB is a recommended minimum if running Jenkins as a Docker container)
Now – since we are not living in 2002 anymore, we can safely post the suggested minimum requirements:
- 4 GB+ of RAM
- 50 GB+ of drive space
This is the recommended for a small team. You can of course adjust to your needs but we do suggest you have a dedicated server or dedicated VPS for running Jenkins. For more information on the hardware requirements to scale Jenkins, you can go to this page for more information.
Installing Jenkins – software requirements
Software requirements:
- Java: see the Java Requirements page
- Web browser: see the Web Browser Compatibility page
- For Windows operating system: Windows Support Policy
- For Linux operating system: Linux Support Policy
- For servlet containers: Servlet Container Support Policy
Installation
Java
To start our Jenkins installation, we first need to check which version of Java is installed on our server. Since Jenkins relies heavily on Java, we need to get this right from the start before continuing. Many Linux distributions (including Ubuntu) does not include Java by default, and some versions are not compatible with Jenkins. So determine which version of Java – if at all – is installed, we will use the java –version command:
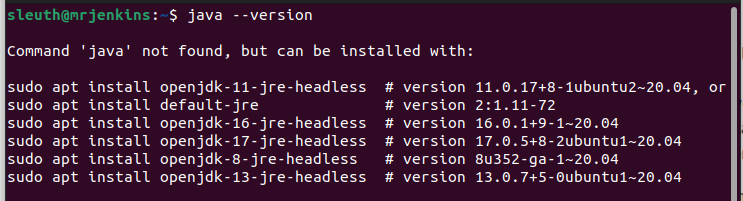
As you can see we do not have any version of Java installed, so we will proceed with installing Openjdk-11-jre on this server.
$ sudo apt update
$ sudo apt install openjdk-11-jre
Jenkins
On Ubuntu, we can install Jenkins through apt. We can install either the LTS release or Weekly release. The LTS release is chosen every 12 weeks from the stream of regular releases as the stable release for that time period.
$ sudo curl -fsSL https://pkg.jenkins.io/debian-stable/jenkins.io.key | sudo tee \
  /usr/share/keyrings/jenkins-keyring.asc > /dev/null
$ sudo echo deb [signed-by=/usr/share/keyrings/jenkins-keyring.asc] \
  https://pkg.jenkins.io/debian-stable binary/ | sudo tee \
  /etc/apt/sources.list.d/jenkins.list > /dev/null
$ sudo apt update
$ sudo install jenkins
The package installation will:
- Setup Jenkins as a daemon launched on start. Run
systemctl cat jenkinsfor more details. - Create a ‘jenkins’ user to run this service.
- Direct console log output to
systemd-journald. Runjournalctl -u jenkins.serviceif you are troubleshooting Jenkins. - Populate
/lib/systemd/system/jenkins.servicewith configuration parameters for the launch, e.gJENKINS_HOME - Set Jenkins to listen on port 8080. Access this port with your browser to start configuration.
If Jenkins fails to start because of a port conflict, you can run systemctl edit jenkins and add the following:
You can use any port you have open.[Service] Environment="JENKINS_PORT=8081"
Now the final two commands you need to run:
$ sudo service jenkins start
$ sudo systemctl enable jenkins
This is it.
Now you can browse to your Jenkins installation on port :8080
Activate Jenkins and initial setup
When browsing to your Jenkins install, you will be met with the Unlock Jenkins screen:

Simply run this command to get your AdminPassword:
$ sudo cat /var/lib/jenkins/secrets/initialAdminPasswordOnce you have completed this step, you will see the following screen:
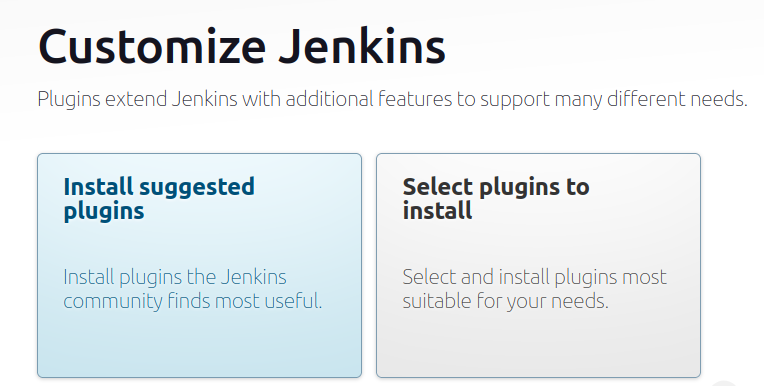
For now, you can just install the selected plugins. After this you will be required to create the Admin password for the login. And then you are set.
You can install further plugins as per your needs to enable all the required services you will use.